Creating Accessible PowerPoint Presentations
Note: The easiest way to ensure accessibility is to type or paste directly into Canvas' Rich Content Editor and not use PowerPoint at all. You can also create a narrated video of your PowerPoint, and post it to 3C Media and get it captioned.
- Check for accessibility in PowerPoint
- Using templates
- Adding descriptions to images
- Reading order
- Adding tables and graphs
- Converting to accessible PDF
Check for accessibility in PowerPoint
To check accessibility of a presentation in PowerPoint, follow these steps:
- Open your document in PowerPoint. Click the File tab. The Info screen should come
up.

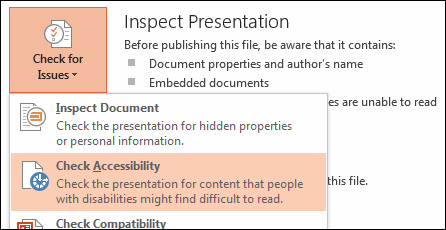
- Click the Check for Issues button, then Check Accessibility.
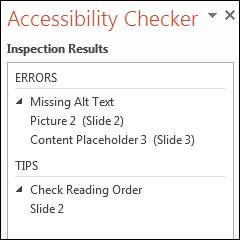
- The Accessibility Checker will open on the right side of the screen. Click on any
of the warnings to see what needs to be fixed. The text below the warnings gives you
information on why it needs to be fixed, and how to fix it.
- Once all errors have been addressed, your presentatation is accessible. You can then upload it to the web if you are sure that all of your students have access to PowerPoint in order to view it.
The most common errors in PowerPoints are that users don't use templates, don't add descriptions to images, and don't properly format tables and graphs. Here's how to address those issues:
Using templates
In order to maximize the accessibility of your presentation, use one of the built-in templates that PowerPoint offers, and try not to modify it.
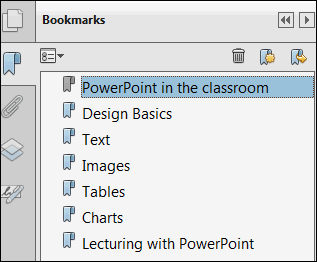
When titling your slides, be sure to use unique titles for each slide. This allows students to use the Bookmarks features in Acrobat Reader to easily go to specific pages in the PDF.
Reading Order
The reading order of the content in your PDF is critical for visually impaired students to access the information in a meaningful way. Unless you fix the reading order within your slides in PowerPoint, your content might appear out of order when read by screen-reading software. For example, you don't want your bullet points read before the title of a slide. Reading order often gets disrupted in PowerPoint when you insert text boxes, and add content. Avoid inserting text boxes.
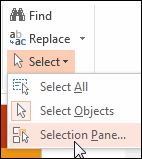
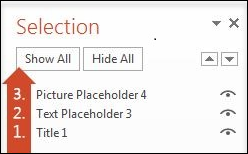
To ensure the proper reading order of your content in PowerPoint, access a slide, and while on the Home tab, click Select in the Editing group, and choose Selection Pane.
The pane will show every object on the slide. Highlighting an object in the pane will also highlight it in the slide. The reading order for the elements will appear from bottom to top. At first this may seem illogical, but it helps to think of these objects as layers on a slide.
The first object on the slide will be read first. For example, the title slide will be read first, so it should be at the bottom of the list. To reorder an item, simply click and drag.
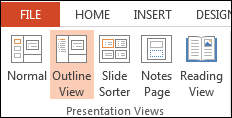
To make sure that all of your written content will be converted to an accessible PDF, look at it in the Outline View. Whatever written content is in your slides will show in the Outline View. To access the Outline View, click the View tab, then click Outline View in the Presentation Views group.
Adding descriptions to images
If your PowerPoint presentation contains an image, you'll need to add a description, known as an alternative text, or alt text. The alt text is read aloud to the visually impaired student by assistive technology, such as a screen reader. Its content needs to be relatively simple, and depending on the image, it should not require an extensive description. The alt text can be a simple phrase or even 2-3 sentences. Either way, it should convey enough information so the visually impaired student has an equal amount of knowledge about the image as the sighted student. Do not start your alt text with "Image of..." because the screen reader will already say the word "Image" once it gets to the image.
Each sentence should end with a period at the end to signal to the assistive technology software that there is a pause in the reading of the text. If a longer description of the image is necessary to fully explain alt text content, consider inserting a more detailed description of the image within the speaker's notes in PowerPoint. When you convert to PDF, you will be asked to convert the speaker's notes. Just do so.
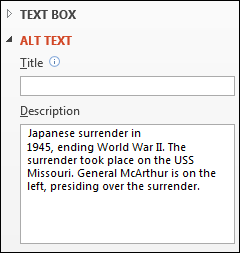
To add alt text, right-click the image, and choose Format Picture. 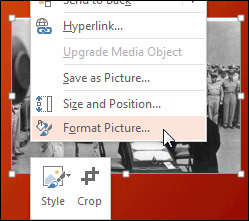
In the Format Picture panel on the right, click the icon for Size & Properties.
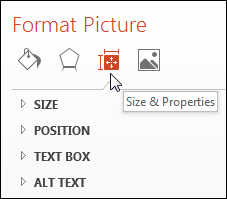
Click Alt Text, and type your description in the Description box. Do NOT type in the Title box. If you type in both the title and description boxes, the visually impaired student's screen reader will only read the title box.
Adding tables and graphs
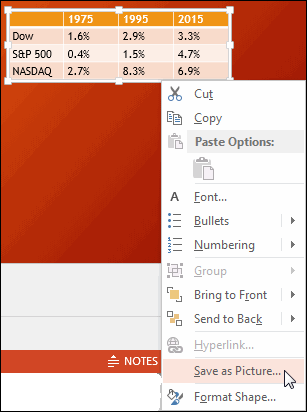
Many tables and graphs, particularly those that come from textbook publishers, contain lots of information. If that information is critical to student learning, you will have to describe everything so the visually impaired student has equal access to the content. The easiest way to do that is to: a) create the table or graph, b) save the table or graph as a picture to your computer c) insert that picture into your slide, d) delete the original table or graph, and e) add alt text in the same manner as above.
To save the table or graph as a picture:
Select it, then with your mouse at the edge of the table or graph, right-click, and choose Save as Picture.
Note: when you create a table in PowerPoint, it should only contain text; do not put images or any other elements into your table.
Once your presentation is accessible, save it, then upload it into Canvas.
Converting to accessible PDF
If you need to convert your PowerPoint to a PDF, you will have to make it accessible.
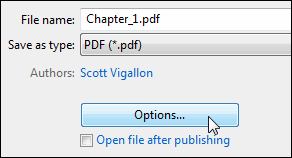
- In PowerPoint, click File, then Save As.
- Choose where you want the file to be saved.
- Select PDF as the Save As type, then select Options.
- Check the box for Document structure tags for accessibility.
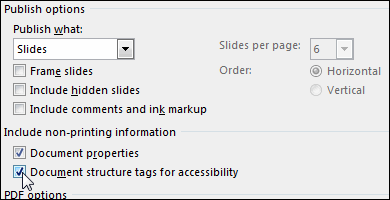
- Click OK.
When the conversion is finished, you can upload the accessible PDF to Canvas.

