
Telecommunications
The college telecommunications system encompasses all of the equipment and services that make up the campus voice communications system. This page is intended to give the user information and instruction on how to use frequently requested features of the desk top phone set and voice mail messageing. For any questions regarding the campus telecommunications system contact the Telecommunications Coordinator at 925.424.1640.
Desktop Devices
The college has installed a Hybrid PBX (private branch exchange) that has the ability to configure analog and digital devises. Digital phones are provided for all offices, by request, and in accordance with the college deployment standards. In-house/ guest phones, with limited dialing capability, are also available in areas of the college that are open access.
Placing a call off campus
- Get dial tone.
- Enter the trunk access code.
- Dial the 7 digit number or 1 + the area code + the 7 digit number.
Dialing restrictions are placed on some phones. Contact the campus switchboard for assistance.
Dialing Offices at Chabot and District
- Get dial tone.
- Enter the 4-digit extension
Commonly Used Phone Features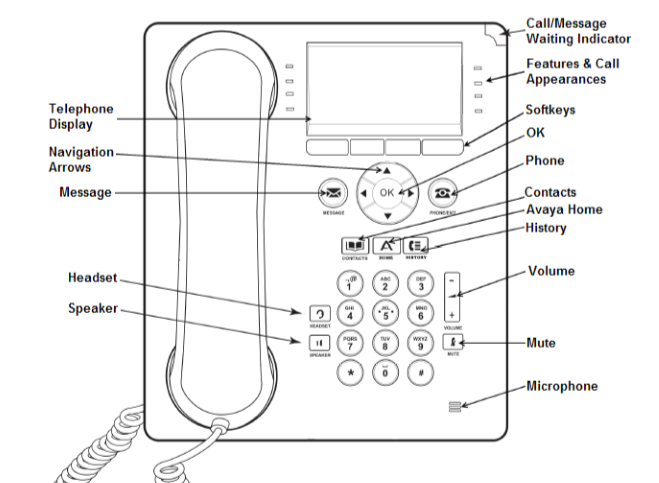
Phone Menu/ Exit
To exit the feature currently in use and return to the main screen, press the PHONE button next to the NAVIGATION ARROWS.
Drop
The DROP soft key can:
- Clear misdialed digits while the caller is in CONFERENCE or TRANSFER mode.
- Disconnect call and give dial tone again.
Message Button
- The MESSAGE button next to the NAVIGATION ARROWS will glow when you have a new message.
- Press the MESSAGE button to access the voice mail system. (Refer to the Voice mail web page for more instructions).
Transferring a call
- With the caller on the line, press the TRANSFER soft key.
- Enter the extension of the office the call is to be transferred to.
- Hang-up any time after the call begins ringing or stay on the line to announce the call before hanging up.
Placing/ Retrieving Calls on Hold
- With the caller on the line press the HOLD soft key.
- To pick up the caller on hold, press the LINE button.
Forwarding/ Unforwarding calls to another extension
- Using the DISPLAY scroll to and press the CALL FORWARD button.
- At the dial tone, enter the desired 4-digit extension. Hear the tones to confirm.
- To unfroward, press the CALL FORWARD button.
Sending/ Canceling All Calls to Voice Mail
- Using the DISPLAY scroll to and press the SEND ALL CALLS button.
- To cancel SEND ALL CALLS, press the glowing SEND ALL CALLS button.
Creating a conference call with up to 6 people
Have one of the conference participants on the line:
- Press the CONFERENCE soft key.
- Dial the number of the person to be conferenced in. (this person could be on-campus or off-campus, just remember to enter the appropriate dialing sequence when going off-campus).
- After the next participant answers, press the CONFERENCE soft key to join everyone. If the next participant does not answer, press DROP to end that call but not the conference.
- Repeat the CONFERENCE > Dial > CONFERENCE sequence until all participants are joined.
Dialing via the Directory
For internal numbers only.
- Using the NAVIGATION ARROWS, scroll to and press the DIRECTORY button.
- Using the KEY PAD, dial the first 4 characters of the person's last name.
- Use the NEXT button to locate the person.
- Press the MAKE CALL button to call the person.
Viewing Call History
Your incoming and outgoing calls are logged and available for you to view. Any missed calls will cause the HISTORY button to glow.
- Press the HISTORY button.
- Using the NAVIGATION ARROWS, scroll between: Answered, Outgoing, All calls, and Missed.
- Using the NAVIGATION ARROWS, scroll up and down the list.
- Use the SOFT KEYS for additional features.
- Press the PHONE button to exit.
Creating Contacts
You can create a listing of your personal contacts.
- From HISTORY
- Press the HISTORY button, scroll through and locate the desired phone number.
- Press the +CONTACTS soft key.
- Using the KEY PAD enter the desired name and press the SAVE soft key.
- From CONTACTS
- Press the CONTACTS button.
- Press the MORE soft key and then NEW soft key.
- Using the KEY PAD enter the desired name.
- Arrow down and enter the phone number including access code and area code.
- Press SAVE soft key.