
Canvas Accessibility
Using Styles in Canvas
Make sure to utilize styles when adding text into Canvas' Rich Content Editor. This allows blind students using screen-reading software to distinguish between titles and regular text. If you don't use styles, all of your text will run together, and blind students won't be able to tell the hierarchical structure of your content.
To use styles, simply type your text, highlight it, then select the proper style. There are a handful of choices, but the ones you will be using most are Paragraph, Header 2, Header 3, and Header 4. Paragraph is regular text, Header 2 is the biggest header, Header 3 is the next size down, and Header 4 is the smallest.
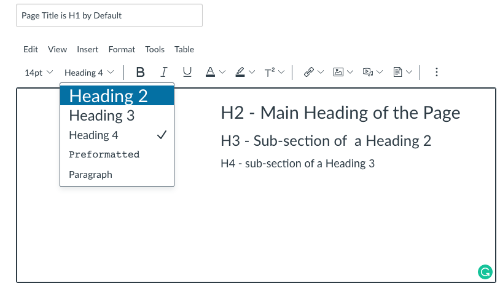
Since Canvas uses Header 1 for its page title, always begin with Header 2. Your subheadings should start with Header 3. Do not skip heading numbers.
Two other notes about the Rich Content Editor and accessibility:
- When using numbers to put text into a list, use the editor's list Numbered list tool as opposed to typing in the numbers. This allows the screen reader to read the content more meaningfully. Using the Bullet list tool is also helpful.
- It gets kind of tricky to make accessible tables in Canvas. Try to avoid creating tables in the Rich Content Editor.
Adding Alt Text to an Image in Canvas
When you insert an image into Canvas for students to view, you will need to add alternative text, or alt text, which is text "behind the image" that describes the image. Visually impaired students need alt text to hear the description read to them via screen-reading software.
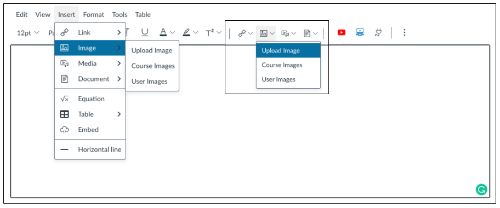
After you upload an image into Canvas, use the Embed Image icon in the Rich Content Editor to place the image where you desire. The content of the alt text needs to be relatively simple, and depending on the image, it should not require an extensive description.
The alt text can be a phrase or even 2-3 sentences. Either way, it should convey enough information so the visually impaired student has an equal amount of knowledge about the image as the sighted student. Some other pointers:
- Don't copy text that students are reading and paste it in as alt text.
- Don't begin your alt text with "Image of ..." because the screen reader will already say that.
- Don't use the filename of the image as the alt text, particularly because it includes file extensions (.jpg, .gif, .png).
- If your image contains text, make sure to include those same words as alt text.
- Check the Decorative Image box if the image has no pedagogical value and is simply for decoration.
Using Explanatory Links
Good link text should not be overly general; don't use "click here" as a link. "Click here" says nothing about what is to be found if the link is followed. Instead of "click here", link text should be explanatory and indicate the nature of the link target.
Linked text should indicate to the users where the link will go if they choose that link. In the sentence below, users know that if they choose the link, they will go to the Accessibility Community in Canvas.
Learn about Canvas' accessibility efforts in its Accessibility Community.
In poor examples, the linked text does not indicate where the link will go. In the sentence below, it is not clearly understood that the link will go to the Strawberry Nutritional Guide.
Click here to see the Accessibility Community in Canvas.
Also, do not use web addresses (e.g.http://bit.ly/1YixxlB) as links because screen readers will read every character aloud, making for long, tedious, and sometimes nonsensical, listening for blind students. Finally, do not underline text that is not a link as means of emphasis. If you are typing the name of a book, use italics; when students see a word(s) that is underlined, they will think it's a link.